How to Make a Pony Play Bridle
Photography by James LiGate
Copywrite 2003 The Tackmaker

Bridle and bit
The Tack Maker welcomes you
I am The Tack Maker. i am a 44-year young female sub, newly divorced. i am raising 3 kids in the Virginia country outside of DC. i have 6 horses, 3 dogs, 2 cats, and some fish, with chickens on the way in the spring. All that plus a full time job, go figure! i love doing crafts from ceramics to sewing to leather. i started making my own toys when i entered the lifestyle 7 years ago, mainly because i enjoy making things with my hands. This led to creating a website where i showed others how to make their own toys. If i could do it, they needed to have faith they could too.. Soon i hope to resume my belly dance classes and i play the bagpipes which some say proves i am a masochist. Oh, before I forget, I am not a pony, I just like to make things and I like to make people happy.
In this article I will show you how to create your own pony play bridle. This one is simple to make, effective, and completely adjustable. The X design makes the bridle very secure to the pony with negligible slipping. Very little leather is required so the expense is minimal. To make it, you need only basic leather working tools and three skills: cutting, riveting, and attaching buckles. Almost anyone who has made anything from leather before, or who has a friend who has done so, can complete this project in an afternoon.
The Bit
The first thing to buy is a bit. This may seem simple but it is the most important part. It is what is used to control the pony and can make or break how play goes. i recommend a straight rubber bit. The rings are a personal preference. I like small rings on my horses; others prefer large. The bit in the photos is 5 ½ inches long, with 3-inch diameter rings. Get what YOU like.
Leather
The leather I used for this project is 4-5 oz thick. You can buy belt blanks, which are leather straps ready to make a belt. These are normally plain leather so you will need to dye the leather to the color desired. If you go this way, I suggest using a finish coat on the straps to make them nice and shiny. The leather for the disks might come from the scrap bin of a local fabric store. Seek out one that supplies materials for upholstery.
Another option is to buy a leather side and cut the strips from it. I do this myself because I make most all my toys. Right now I have over a dozen hides in my barn, so be careful, it can become addictive!
Parts
You will need 3 buckles. I prefer the buckle holding the bit to be larger than the two buckles that attach the head straps to the bit strap. The size of the buckles will determine the width of the straps so keep that in mind when buying the buckles. Roller buckles are easier to use but not necessary. A locking buckle for the bit strap is also an option: this would create a “Locked Collar” look and feel which some prefer.
Rivets or snaps are necessary, but keepers are not.
Tools
You will need a protractor, a rotary leather punch, leather riveting tool, a cloth measuring tape, and a scribe. For cutting you can use a ruler, straight edge, and razor. Pick the way you feel most comfortable. For a more finished look bevel the edges and burl them smooth. For contrast I did not dye the edges of this bridle. It was purely for a personal preference. Okay, so it also helped out with photo contrast and time to make the bridle.
Construction Step By Step
First place the bit into the pony’s mouth and measure from the edge of the ring as it rests against her left cheek to where you want the buckle to START. Remember when you measure to do it under the hair since the hair is not to be trapped under this strap. Cut a piece of leather to the width of the buckle and length of the measurement plus 3 inches. Now is the time to do any finish to the edges, before you attach it to the bridle. Attach one end to the bit ring with two rivets or snaps. Attach the buckle to the other end. See below.
Now place the bit back in the pony’s mouth. Bring the strap around the left side of her head so that the buckle is at the back of her neck.
The next measurement is from the end of the buckle to the other bit ring. Add 5 inches to this number and cut another piece of leather, same width as the first. Attach this to the other bit ring using a rivet or snap and punch holes approximately 1/4 inch apart to receive the buckle. Try it on the pony to make sure it is fits snugly. The bit should be far enough back that she cannot spit it out, but not so far back that it causes excessive jaw discomfort. Leave it on since we go for more measurements in a moment.
Measuring the head straps
After standing back and admiring your pony, watching the drool and such perhaps, measure from one bit ring top, over the head to the bit strap on the opposite side. You should position the measurement ending somewhere behind the ear on the strap. You will need to cut two of these straps. Do not add length to this strap since connecting it to the bit ring will make it the correct length.
The Disks
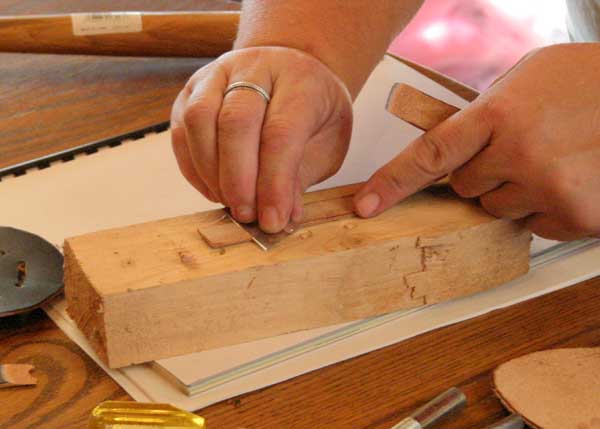
To make the round piece on the top place the two straps you just cut in an X with 90-degree angles. The width of the straps and just how big you want the finished disk assembly determine the size of the disks. For 3/8-inch wide straps, 3 ½ inch disks work well. You have to make them big enough so you can cut slots for the straps to go in and out of the leather disk assembly without jeopardizing the integrity of it. Now you also need to allow for the gluing area around the edge so it doesn’t glue the straps to the circles. The straps need to be able to move freely through the slots. Cut two of the disks. If one of them is slightly larger, cut the slots in that one, if they are the same size, use either. Mark the locations of the slots with a scribe. Next, punch holes just inside these marks and cut between the punched holes with a razor blade or utility knife. Cutting just inside the marks makes the slots tight enough to hold the leather straps secure. Place the straps through the slots in the X configuration. The position doesn’t matter right now since it is adjustable. On the disk without the slots, place a line of glue around the edge on its unfinished side. Adhere the two unfinished sides together, sandwiching the X between them. This creates pressure to keep the straps from moving.

measuring the outline for a disk

marking the outline
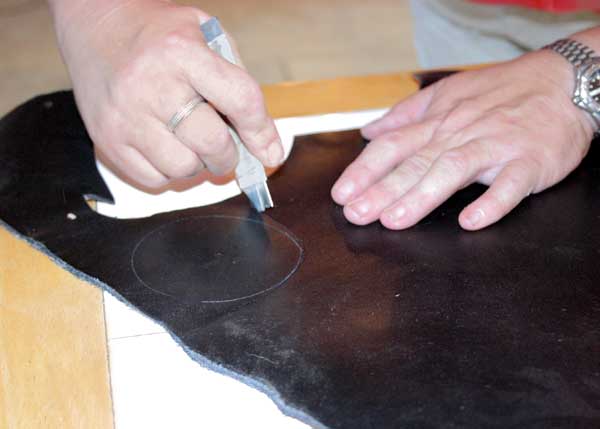
cutting a disk

marking for slots with a scribe
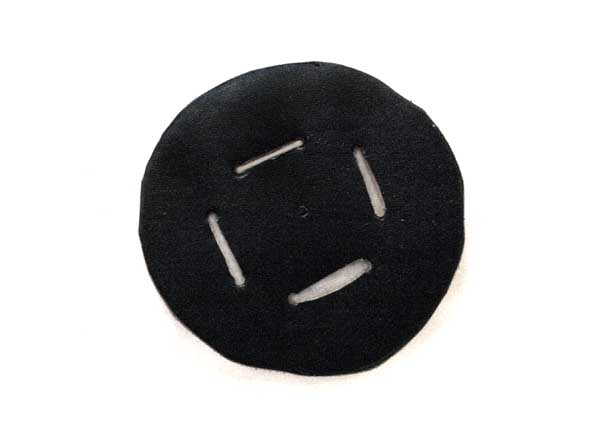
finished upper disk

both head straps inserted through upper disk, applying glue
Glue the disks together
Not all glues are designed for leather, not even super glue. When you get your super glue, make sure it says on the package that it is intended for use on leather. I found the gel super glue to be nice since it took mere minutes to form a bond that will out last the leather. Contact cement could be used but it will take time to dry before you can continue.
Attaching the strap assembly to the bit Attach the left head strap to the left bit ring using one rivet or snap. This will be on the top of the ring with the bit strap below it. Repeat the same procedure for the right head strap and right bit ring. On the other end of the straps punch holes to go into the buckle, roughly ¼ inch apart.
punching hole for attaching head strap to bit ring

riveting head strap to bit ring
Traveler Straps
Each traveler strap will have a loop on one end to slide along the bit strap and the other end will be the buckle for one of the head straps. You will need at least 6 inches of leather strap, more if your bit strap is wider than one inch. The buckle you use determines the width of the strap. Loop one end around the bit strap and secure it with a rivet. Try to make it fairly snug. On the other end attach the buckle with a rivet.

traveler being attached to bit strap, buckle slot being cut

traveler strap under construction
Done!
Believe it or not, it’s done! When placing the bridle on the pony, all the straps can be adjusted to fit, so start with all straps loose. Move the travelers so that they are far enough behind the ears so that all straps stay away from the ears. Pull the head straps to bring the top disks closer to the face or further away. Tighten the bit strap so as to position the bit in the mouth where desired. Make one last check of the head straps to see that the fit is snug and secure.
Attach reins to the bit rings between the bit strap and the head strap. I went to a tack shop and bought the ones shown for $30. They are long enough and light weight.
Most important is making sure the pony is comfortable. Make sure the ears aren’t crimped, no skin is pinched, and the bit is secure so it doesn’t slip and hurt the pony’s mouth. And above all, have fun!
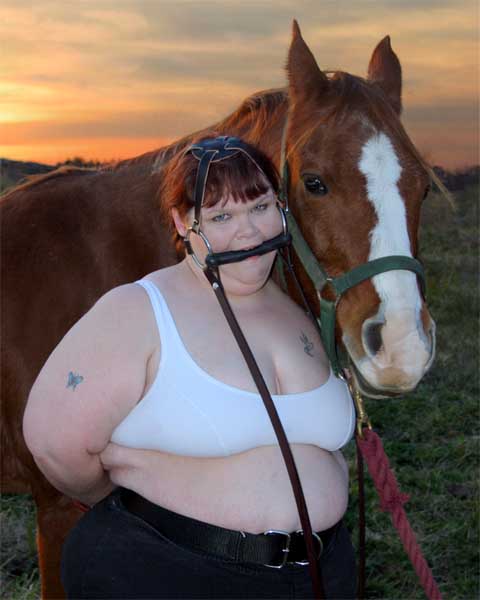
Bridle and bit modeled by pony Jen
Footer:
The Tack Maker can be reached via the contact form on this site.
James LiGate can be reached at escape@usa.net. You can see more of his work at http://www.modelmayhem.com/513211
Jen’s email address is FlirtyPonyGirl@aol.com
Sidebar: Using rivets, attaching buckles
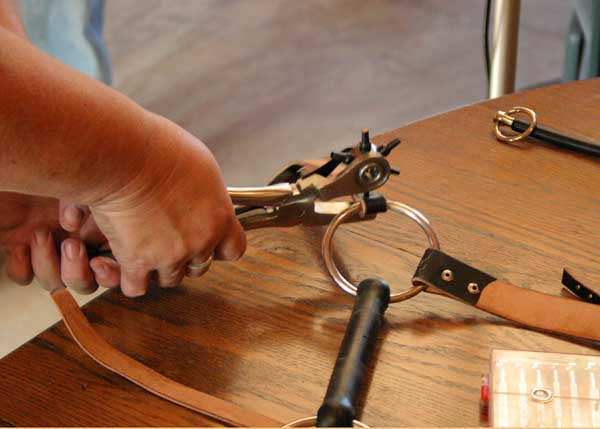
To set a rivet, first decide where you want the hole. With a rotary punch selecting the size to allow the post of the rivet to go through but still very snug, cut holes in the pieces of leather. It is easiest to place the two pieces together as you want them and cut them as one. Place the long piece of the rivet through the bottom of the leather through the holes. Place the bottom side of the rivet on top and press together gently; most likely you will hear a snap and it stays together. Place the leather with the rivet on a solid surface. It needs to be marble or scrap wood, since the impact could make marks on the surface. Place the rivet setting tool over the rivet, and with a hammer hit the setter, securing the rivet and the leather.
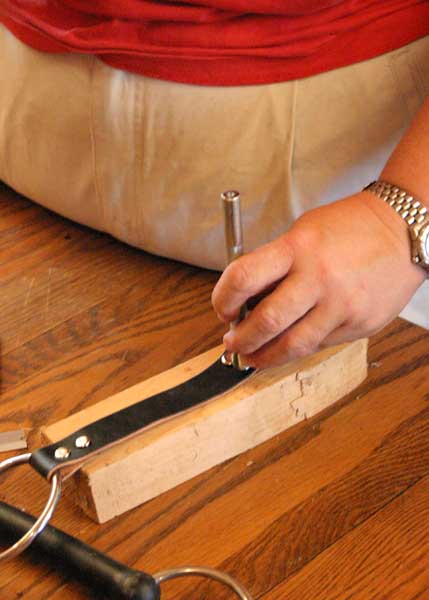
setting a rivet

attaching a buckle
To attach a buckle, take the end of the strap where you want the buckle in one hand. Measure approximately 1 – 1/2 inch up. Punch 2 holes that are as wide as the tongue of the buckle approximately 1/2 inch apart centered on the mark from the end. Cut between the two holes to make an oblong hole. A nice finish is to taper the end of the leather on the unfinished side so it lays well: just the last ½ inch and only to about 1/2 the thickness of the rest. Slip the buckle on so the tongue of the buckle slips through the hole. Fold the leather over securing the buckle. Rivet the two pieces of leather together.
skiving the end of the strap before punching holes for the rivet
Sidebar: Parts List
1 Bit, rubber, 5 ½ inches long with 3-inch rings
1 Buckle, 1 inch wide
2 Buckles, 3/8 inch wide
13 rivets – or – 6 rivets and 5 snaps
Leather to make the following straps, 4 or 5 ounce weight:
1 right bit strap – 7 in. long, 1 in. wide
1 left bit strap – 8 in. long, 1 in. wide
2 head straps – 15 in. long 3/8 in. wide
2 travelers – each 6 in. long 1 in. wide
2 disks, each 3-½ inch diameter
Tools:
Protractor
Rotary leather punch
Leather riveting tool
Cloth measuring tape
Scribe
Straight Edge
Utility knife
Supplies:
Gel Super Glue
Gum Trajicanth – optional – for burling
Dye – optional